
Troubleshooting and Fixing a Faulty Keyboard
Identify the Issue
The first step is to carefully inspect the keyboard to identify the root cause of the problem. Check each key for stickiness, proper spring function, or visible dirt and debris stuck beneath them. Pay close attention to keys that are non-responsive. keyboard repair troubleshooting sticky keys. It’s also a good idea to gently shake or flip over a standard desktop keyboard to dislodge any loose particles inside. internal PC keyboard cleaning solutions. Avoid this with laptops to prevent hard drive damage.
Remove and Clean Individual Keys
If inspecting reveals stuck or faulty keys, it’s time to remove them for cleaning. Gently lift each problematic key using a small flathead screwdriver or knife. Apply steady upward pressure until it pops off. remove individual keyboard keys. Handle the keys delicately to avoid further damage. Blow out each keywell and surrounding area with compressed air to dislodge built-up grime. clean internal computer keyboard debris. Tweezers may help retrieve any stubborn debris or small plastic inserts between the keys and circuit board. Replace any removed parts carefully.
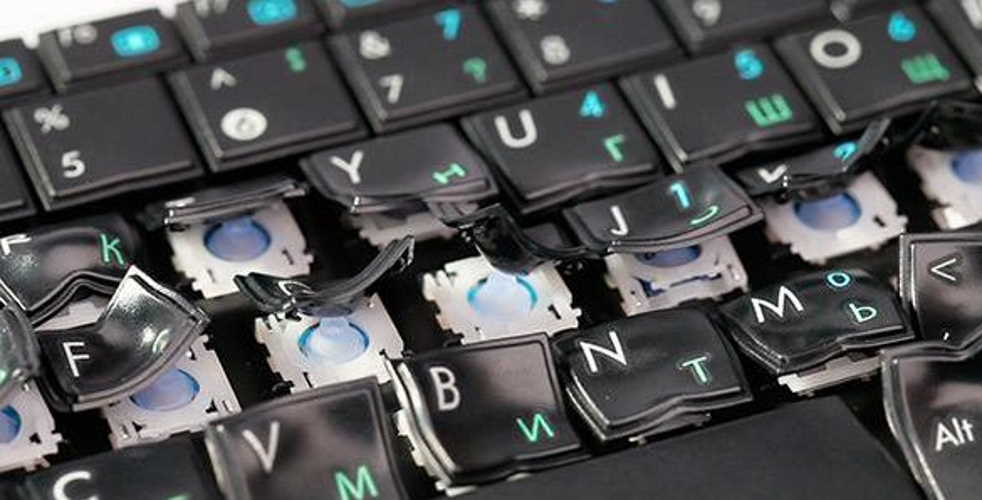
Deep Clean the Entire Keyboard
For more thorough cleaning, fully disassemble the keyboard. Note the position of each screw, key, and internal part to ensure correct reassembly. disassemble laptop keyboard for cleaning. Use compressed air to clear out all debris hidden beneath keys and wiring. blow out hidden laptop keyboard dirt. An alcohol wipe or contact cleaner can help dissolve stubborn residues. Allow all chemicals to fully evaporate before reconnecting power. Inspect for faulty wiring, loose connections, or failed components while disassembled. Basic soldering skills may fix these issues.
Isolate Individual Non-Responsive Keys
If cleaning keywells doesn’t fix specific faulty keys, focus repair efforts there. First attempt to access and clean those individual key mechanisms more directly. troubleshoot individual stuck keyboard keys. On some keyboards, small plastic covers beneath the circuit board can be removed for deeper access. Clean and gently probe disconnected wires or junctions with electrical contact cleaner or very fine-tipped tweezers. fix individual laptop keyboard keys not working. Replacement may be the final option if all else fails to restore proper function.
Consider a Temporary On-Screen Keyboard
For non-fixable issues rendering many keys unusable, an on-screen virtual keyboard provides an interim solution. Access the accessibility settings or download dedicated software to display a keyboard overlay on the monitor. use on-screen keyboard when keys not working. It allows basic computer use until a permanent repair or replacement is found. Bind frequently typed shortcuts to still-working physical keys for efficiency. remap keyboard shortcuts to working keys. Patience is key when relying solely on a software keyboard long-term.
Replace the Entire Keyboard Unit
As a last resort, replacement may be the only fix if cleaning and repairs don’t resolve widespread issues. replace laptop keyboard not working. Remove any accessible screws or clips to detach the malfunctioning unit. Installation is usually the reverse process of these removal steps. Gently reconnect all wires and ribbon cables to the new keyboard module. Confirm proper function before closing everything up. replace internal laptop keyboard easy instructions. An OEM or direct laptop model match helps ensure a seamless installation to restore normal typing ability.
Use On-Keyboard Character Codes Temporarily
If just one or a few keys stopped working, quickly enter those characters temporarily using ASCII codes. Hold the Left Alt key and type the 3-digit numeric code on the keypad for that character. Release Alt to generate it. enter characters using ascii codes laptop. This workaround allows limited typing until a real solution is found. Be aware it’s slower than normal typing and won’t replace a fully-functioning keyboard long-term. But it gets the job done in a pinch.
Wrap-Up and Conclusion
With logical troubleshooting and a few basic repair techniques, a balky keyboard doesn’t have to be the end of usability. Start with non-invasive inspection and cleaning before considering deeper disassembly. Isolate specific faulty components when possible. troubleshoot and fix individual keys on laptop. Virtual keyboards can function temporarily but a real fix is preferrable. Replacement remains an option of last resort. when to replace broken laptop keyboard. Armed with patience and the right advice, most keyboard issues can be remedied without a costly full replacement. With some care and DIY skills, even years-old keyboards can regain full function.
